Showing posts with label altered art. Show all posts

Friday, October 25, 2013

Double, Double Toil and Trouble

Anyone who follows me on Instagram or Facebook will remember that yesterday I posted a teaser of spooky things to come:
Ghosts and owls and bats and spiders, oh my!
I have the joy of belonging to an art group locally where every couple months we get together and just CREATE. Tonight we meet again, and our "homework" was to alter a witch's hat and Tim Holtz clock. Tragically, the clock is barely started. I blame the fact that my boys want clean socks and spoons. Obviously they've become spoiled...my witch's hat, however, I'm bringing with me tonight to show off and I love it!
The really scary part is that messy craft table!
Oh this was a fun project! The base was a plain, kraft colored witch's hat ready for finishing. The top half of the hat I covered in 1" strips of scrapbook paper using Modge Podge. The brim was then coated in Modge Podge and topped with a glitter mixture I made myself; black, deep purple, and lime green all mixed together. I then hid my paper ends with some black grosgrain ribbon.
My little rat familiar
Once everything had dried, I added on my little rat friend here. I found him at Joann's and I love him. There's just something about rats and Halloween that just seem to go together. His little paws got glued down to the hat brim with the help of some 3-in-1.
My stylish owl familiar
Then I found my owl at Michael's. It's an owl. Wearing a top hat. Um, YES! His feet got tacked down with 3-in-1 as well, and he's so stinkin' cute. I think he and my little rat friend need names.
Boo! Meow!
Of course, since it's my hat, I had to have a Halloween kitty on it. There's little Salem, hiding behind the ghost tag ready to pounce!
Spoooooky Halloween tags
Speaking of those tags, are you loving them as much as I am? I inked up two of the freebie tags Unity loves throwing in with their orders. The large one is a mix of Concord Grape and Black Soot Distress Inks and the little one is Peeled Paint, Wild Honey, and Black Soot. The images were stamped with Black Soot as well, then when they were dried I added in liberal amounts of Rock Candy Distress Paint. I love how grungy and spooky they turned out! The ribbon I had stashed in a drawer and looks like it once came from the dollar bins at Target. Some Glue Dots holds them down nicely.
Scary spider bling
Finally, I added spiders; big, blinged out, spiders and their web. Yeah, they're pretty awesome.

I cannot wait to see what the other ladies came up with tonight! It's bound to be a good time. I'm linking up to Unity Friends With Flair.

Happy Crafting!

Tuesday, August 21, 2012

PbD Challenge #11

Altered mini composition notebook
Back cover
Front inside cover
Back inside cover
This week's challenge over at Pink by Design was to create a project using school supplies. Well, seeing as my DS is only in daycare, we actually don't have too many around the house...but I did have some mini composition notebooks! I decked it out with paper that reminds me of old school photos and some washi tape (hey, it's tape, right?). The inside cover reminds me of ledger paper...or an attendance sheet! The little rectangle referenced ink, and we all know that you use pens in school. The back cover got some striped paper (school colors?) and the sentiment on the cover...well, that's just me.

How's that for thinking outside the box?? :D

You can play along here.

Happy crafting!


Thursday, March 8, 2012

Craft Show Season is Coming...

...and boy am I not quite ready! Yes, that's where I've been instead of blogging: locked in the craft room coming up with items to replace all of my holiday things. Somehow I don't think people want to buy Christmas ornaments in March...I could be wrong, but better to play it safe. I've been scouring the web for cute ideas and collecting them on my Pinterest board. Of course, the time has come to stop collecting and start making, especially since the first show of the year is this Saturday!  Eeep!

So while I'm about to head upstairs and start assembling magnetic grocery lists, here's a peek of what my dining room table looked like Tuesday:
Of course that's my coffee cup. Like I craft without it?!?


Yup, tile coasters! I made up an entire case of them (one case = 80 tiles). There they sit, drying, hoping that no kitty or toddler gets their grubby paws on them. (Thankfully they were safe, but it was a valid concern.)

Closer shots of the patterns (yeah, they're not great, but it was my camera phone into direct sunlight. Give me some credit!)
One half of the table...
...second half of the table
They came out really cute. Now hopefully they'll all get nice homes on Saturday! If you're in the area, stop by the Johnstown High School and adopt a few sets, hmm? :)

Ok, off to play with grocery lists and Modge Podge...erm, though not together.

Happy Crafting!

Tuesday, January 31, 2012

Take a Note!

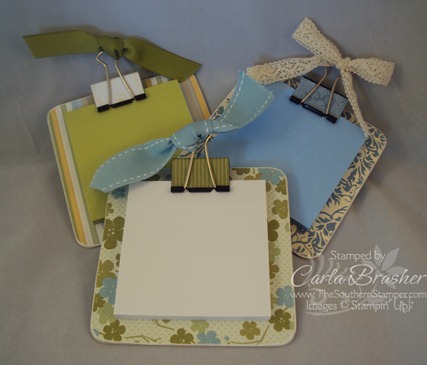
I've been hunting the web for new ideas for craft shows. Hopefully I'll be in two come March and was faced with the problem of what to fill the table with instead of, oh, Christmas ornaments...I know, what a thought. In my wanderings I came across these cute little Post-it note clipboards and had to try them myself.
Ridiculously cute, right?? Off to Staples I went to stock up on Post-it notes and binder clips (two of my favorite things). They're so, SO simple to make as well! Here's what you need:
  • chipboard or really stiff cereal box cardboard cut to 4"x4" for the base
  • pretty paper cut to 4"x4", two pieces for each clipboard
  • medium-sized binder clip
  • more pretty paper cut to 1.25"x2"
  • adhesive
  • sandpaper
  • ribbon
  • corner rounder or crop-a-dile
  • Post-its
From here, it's really simple. Take your chipboard and put a piece of the 4"x4" paper on each side, sticking it down with adhesive. While that dries/sits, cover your binder clip with the smaller paper strip tacking it down with adhesive on each side. Round the edges of your chipboard with your crop-a-dile, corner rounder, or scissors. Use the sandpaper to even out all the edges and give it a slightly rustic look. Clip the Post-its to the chipboard with your decorated binder clip, tie a ribbon on it, and you're done! Here's how mine came out:
I'd love to see how yours come out if you try the project! Happy crafting!


Here's where I'm linking up to this week: