Showing posts with label gift giving ideas. Show all posts

Tuesday, May 29, 2012

Prepping for the Craft Show, Part 1

Craft show season is upon me once again! So while the weather was gorgeous this weekend, I was working away on the porch (out of the sun!) on the latest batch of Modge-Podge projects. :)

I love how well my tile coasters come out (and honestly, how well the sell at the shows!) so I was working away making more of those. Gotta keep those designs fresh! My almost-brother-in-law had the great idea of making trivets as well to coordinate with the coasters so I'm giving those a try this time as well.

I started off upstairs during nap time cutting up all my new papers. I have to say, the new Recollections pads from Michael's are ADORABLE!

Small squares are coasters, larger ones are trivets

Aren't they pretty? I love how well they cut up and coordinate
I'm such a sucker for nature prints
After slicing & dicing, outside I went to start putting them on my tiles. They're looking so pretty!

Yes, you DO see clothespins in the back! I FINALLY found the large clothespins again!!! Yay!!! They got decked out in fun kitchen-y paper and will have their recipe cards added to them soon. I haven't seen any of them in my local stores since January. It's been killing me not to have them!

After all the clothespins and trivets dried up, it was time to work on the coasters. It's so nice being able to be outside - everything dries so fast!
How do I know when I have enough coasters? When the table is full!
Other angle. I love the new patterns!
Ok, time to hit 'play' on the Cookie Monster DVD again...or so I'm told. :) Besides, I need to get back to work on magnets!

Happy Crafting!

Thursday, March 8, 2012

Craft Show Season is Coming...

...and boy am I not quite ready! Yes, that's where I've been instead of blogging: locked in the craft room coming up with items to replace all of my holiday things. Somehow I don't think people want to buy Christmas ornaments in March...I could be wrong, but better to play it safe. I've been scouring the web for cute ideas and collecting them on my Pinterest board. Of course, the time has come to stop collecting and start making, especially since the first show of the year is this Saturday!  Eeep!

So while I'm about to head upstairs and start assembling magnetic grocery lists, here's a peek of what my dining room table looked like Tuesday:
Of course that's my coffee cup. Like I craft without it?!?


Yup, tile coasters! I made up an entire case of them (one case = 80 tiles). There they sit, drying, hoping that no kitty or toddler gets their grubby paws on them. (Thankfully they were safe, but it was a valid concern.)

Closer shots of the patterns (yeah, they're not great, but it was my camera phone into direct sunlight. Give me some credit!)
One half of the table...
...second half of the table
They came out really cute. Now hopefully they'll all get nice homes on Saturday! If you're in the area, stop by the Johnstown High School and adopt a few sets, hmm? :)

Ok, off to play with grocery lists and Modge Podge...erm, though not together.

Happy Crafting!

Tuesday, January 31, 2012

Take a Note!

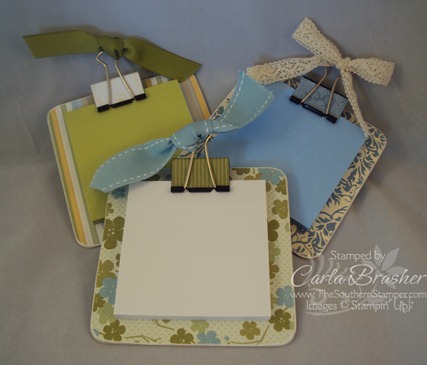
I've been hunting the web for new ideas for craft shows. Hopefully I'll be in two come March and was faced with the problem of what to fill the table with instead of, oh, Christmas ornaments...I know, what a thought. In my wanderings I came across these cute little Post-it note clipboards and had to try them myself.
Ridiculously cute, right?? Off to Staples I went to stock up on Post-it notes and binder clips (two of my favorite things). They're so, SO simple to make as well! Here's what you need:
  • chipboard or really stiff cereal box cardboard cut to 4"x4" for the base
  • pretty paper cut to 4"x4", two pieces for each clipboard
  • medium-sized binder clip
  • more pretty paper cut to 1.25"x2"
  • adhesive
  • sandpaper
  • ribbon
  • corner rounder or crop-a-dile
  • Post-its
From here, it's really simple. Take your chipboard and put a piece of the 4"x4" paper on each side, sticking it down with adhesive. While that dries/sits, cover your binder clip with the smaller paper strip tacking it down with adhesive on each side. Round the edges of your chipboard with your crop-a-dile, corner rounder, or scissors. Use the sandpaper to even out all the edges and give it a slightly rustic look. Clip the Post-its to the chipboard with your decorated binder clip, tie a ribbon on it, and you're done! Here's how mine came out:
I'd love to see how yours come out if you try the project! Happy crafting!


Here's where I'm linking up to this week:


Wednesday, January 4, 2012

Homemade Coasters

It was a very handmade Christmas at our house. Not only was it a financially-sound option, but it was really satisfying to see someone really excited about gifts we made them.

For my sister and her fiance we made two sets of handmade coasters. Each set had four coasters and were actually very simple to make. We did one set with a monogram (luckily, their last names start with the same letter! It's even funnier that the same thing was true with my husband & I...lol) and the second set was with kitties & a puppy. They have several cats and a dog so it was fitting to give a nod to their furbabies as well.

So, how did we make them?

Warning: the photos came out awful! I had no idea until after the holidays, of course...sigh...

  •  4"x4" ceramic tiles that we found at Lowe's for $0.16/each
  • Mod Podge, matte finish
  • spray Mod Podge, matte finish
  • 3/4" felt furniture circles, 4/tile
  • foam brush
  • 4"x4" design*
*for these personalized tiles I made up my artwork in Photoshop, but you could easily use scrapbooking paper as well

Trim up your paper to 4"x4" and set aside. Lay out your tiles on a covered surface and get your Mod Podge ready. Lightly coat your first tile with Mod Podge and carefully lay your paper over the top. Smooth it out to remove all the bubbles and set aside to let dry. Keep smoothing bubbles around the edges as needed while it dries and don't be afraid to go back in with your finger and more Mod Podge to tack it all down. Continue for all of your tiles and let them all sit & dry.

Once dry, give them a second coat of Mod Podge. Once that coat is dry, spray them all with the spray Mod Podge to give it a sealant against spilled liquids...coasters do seem to attract those. (ba-dum-bump) Once everything is dry (we let them sit for a day or so), apply the felt circles on the bottom to give them that non-skid goodness we expect from coasters. Ta da, beautiful handmade coasters that didn't break the bank!
Monogram coasters with the letter 'L'
 
Kitty and puppy coasters
If you're Photoshop-savvy, here's how you make the custom artwork: open a new file and size it to 4"x4". Let your creative self go crazy! You can fit four printouts on a standard letter-size sheet for printing ease. I used a lightweight cardstock and I would not recommend going heavier.

Where did I get the idea for making coasters? Pinterest, of course! I am truly loving that site...all crafters should hang out on there. Feel free to follow my boards on there for inspiration of your own! If you do make coasters, please let me know so I can see how they came out.

Happy Crafting!