Showing posts with label diy. Show all posts

Monday, February 11, 2013

From Concept to Listing; the Journey of a Coaster

As I sit here waiting for my photo editing site to load (I swear, the thing is loading so slowly it is actually running in reverse!) it comes to me to share the story of getting a product from an idea in my head to being listed in my Etsy store or landing on a craft show table.

Ok, and I might have already caught up on Facebook and Pinterest and therefore heard my blog sobbing in the corner...

This weekend's project has been to dig out of their plastic totes all of the coasters that I made up at the last minute in December for my last craft show. I needn't have bothered as that show was, hands down, the worst show of the season. Ugh. Anyhoo, the coasters are adorable and I was so time starved that I didn't get to have a proper photo shoot for them so that I could list them later. Instead I blearily assembled them until 2am, then woke back up at 6am to package them up and go. So now, two months later, they're seeing the light of day again for their moment in the spotlight. I was lured outside by the siren call of the sun beating down on my porch, aka the best spot in the house for taking natural light photos. That was Saturday; I almost have feeling back in my fingers!

How it usually goes is this: I find paper that I absolutely, positively MUST HAVE as it is adorable/cool/funky and will make awesome coasters. I bring it and all of it's closest friends home with me and get to work. (Have I mentioned I collect paper the way some people collect purses or Pokemon? Yup, gotta have them all!) The paper is cut into squares and brought back downstairs to either my dining room table in the winter or one of my show tables set up outside on the porch in the spring/summer. I make new coaster designs in batches, as it rarely makes sense to pull everything out for only one set*.

With minimal interruptions, i.e. my boys are otherwise occupied, I can fill a 6' table with stage 1 coasters in about 1.5 hours. After that coat dries, the other three are applied over the course of another 3-4 hours. Once the last coat is cured, their little cork feet can be applied and they're ready for a good home. So at the end of a day's worth of work, I can have about 12 sets of coasters complete.

Coasters drying in the sun last October
 Now we move to step two: photos! Since each piece of paper yields two sets of coasters, there's always at least two of every design. That means plenty for shows and Etsy, depending on the season. But in order for them to be listed, there need to be good photos of them. For the coasters, I always take the same four shots; stacked at an offset, one lone coaster focusing on pattern, all four laid out for pattern variation, and one of them all tied up with ribbon, ready for gifting. (Etsy allows five photos, so the fifth is always of the cork feet. Thankfully, that's a photo you take once and use again and again!)

That said, do the math; 4 photos per set of coasters x 12 sets of coasters = 48 photos to take. Don't forget tying them up with ribbon 2/3rds of the way through so you can get all the photos in one sitting. Basically it's a good 2-3 hours of setting up, taking the shots, tying the ribbon, and finishing up the shots. Phew. But hey, then I'm done, right?

Hahahahahahahahahahahaha, no.

Now begins the journey of editing all of those photos. They're downloaded to my laptop, brought into Adobe Photoshop Elements and edited so that all of the colors and details are as true to life as I can get them on a computer. After that, I upload them to FotoFuze for, well, background bleaching is the best way I can explain it. If I upload my images after only editing them in Photoshop, they wind up with a gray wash over the top of them, making them look dingy.
Photo after being run through only Photoshop; see the dinginess? Yuck!
 So I then run them through FotoFuze to remove that wash. Then, and only then, are they ready to be listed. Time for all of that editing: about another 8 hours. When I'm finally done, I swear I'm never going to do that many pictures at once again and go make things for the next week...which means I suddenly have a pile of goodies to take photos of. Curse you, you evil circle of crafty creation!

Completely edited photo, making these coasters ready to be listed. Oh look, they are...
 So there you have it, the creation cycle of a set of coasters from store to table. Now you understand why I give people death glares when they suggest that they could do this themselves or that I charge too much. If I truly added up my time, I probably don't charge enough. But then, that's a blog post for another day.

*You were wondering what the asterisk was there for, right? I break that rule when someone orders a set of coasters I have listed as made-to-order. And now you know. ;)

Happy Crafting,

Saturday, May 19, 2012

Butterfly Note Cards

Finally, a chance to write up a post while the little one throws Legos at my feet...no, really, there went another one. Problem is that I've been crafting a lot lately but haven't had a chance to sit and share them. Ah that delicate balance...especially when using the laptop usually involves a very squirmy toddler wanting to use it, too. :/ Sigh.

Enough about that, let's talk about butterflies! I came across this card on Pinterest and loved the simplicity; the butterfly, the tone-on-tone writing in the background. Swoon. Of course I don't have a stamp that I could do the writing with so it got shelved but not forgotten. Then I came across this card showcasing a double stamping technique with acetate (aka transparencies). Major swoon. Still wanted my paper with writing, though...and then I walked through Michael's and found their new pads of Recollections paper. I might have squealed with glee. Just a little bit.

So what did I make? Take a look:


 Isn't it just adorable?? I really love how it came out. I made them smaller than the usual A2 size, these little cuties are 3.5"x4". Bonus there is that you can get three cards from just one piece of 8.5"x11" paper! Here's a closer look at the butterfly, acetate, and pearl accents (they needed a little bling).


So. Darn. Cute! I stamped the butterfly onto the patterned paper (look, there's the script I wanted!) then stamped it again onto acetate. I carefully cut the acetate butterfly out and used my bone folder to make the wings turn up. I just ran it along the body of the butterfly until it looked right. A little adhesive, and voila!

Of course, I couldn't stop at just one...


Hey, I had to try out all the colors! Besides, they would be lonely if they didn't have friends. Really.

Supplies are listed below, and they set of 3 amazing butterfly cards are listed in my shop. They'd like a good home, please!

Supplies: Queen & Co. pearls in Grass Green, Classy Red, & Sunflower yellow; Recollections Paper 'Habitat'; transparencies; Staz-on jet black ink; butterfly stamp; Versamark chalks

Happy Crafting!

Sunday, April 1, 2012

Peep...peep...nom!

Wow, I have been seriously MIA...two craft shows in a month will do that I suppose. I come bearing a super-cute card, though! Seeing as Easter is right around the corner, I just had to make up some cards. Around here, nothing says Easter like yummy chocolate Cadbury eggs and loading up my Gram with Peeps! She adores the little sugary things almost as much as I adore coffee. I went looking for a Peeps pattern, digi-stamp, anything I could use to start a card with. What did I find? Nothing. Nada. Zip. So after saying a few nasty things about the industry, I made my own. So there.


Isn't he yummy?? I made a whole flock of these little guys (and some bunnies!) and brought them to my craft show Saturday as well. Several went off to good homes. :)

All of the paper was from my personal horde collection. I love square cards but loathe the extra postage, so I made this one 4.25"x4.25". Yup, still fits in a standard A2 envelope. Yes! I fussy-cut the Peep out after coloring him in with watercolor pencils, then gave him a sugary topping with some extra-fine glitter. The teal twine is the gorgeous new twine from Lawn Fawn. Love. It.

If by some chance you absolutely have to have one (and don't feel like making it yourself), I do have it up in my shop!

So, what are everyone's Easter plans? Please share!

Happy Crafting!

Thursday, March 8, 2012

Craft Show Season is Coming...

...and boy am I not quite ready! Yes, that's where I've been instead of blogging: locked in the craft room coming up with items to replace all of my holiday things. Somehow I don't think people want to buy Christmas ornaments in March...I could be wrong, but better to play it safe. I've been scouring the web for cute ideas and collecting them on my Pinterest board. Of course, the time has come to stop collecting and start making, especially since the first show of the year is this Saturday!  Eeep!

So while I'm about to head upstairs and start assembling magnetic grocery lists, here's a peek of what my dining room table looked like Tuesday:
Of course that's my coffee cup. Like I craft without it?!?


Yup, tile coasters! I made up an entire case of them (one case = 80 tiles). There they sit, drying, hoping that no kitty or toddler gets their grubby paws on them. (Thankfully they were safe, but it was a valid concern.)

Closer shots of the patterns (yeah, they're not great, but it was my camera phone into direct sunlight. Give me some credit!)
One half of the table...
...second half of the table
They came out really cute. Now hopefully they'll all get nice homes on Saturday! If you're in the area, stop by the Johnstown High School and adopt a few sets, hmm? :)

Ok, off to play with grocery lists and Modge Podge...erm, though not together.

Happy Crafting!

Tuesday, January 31, 2012

Take a Note!

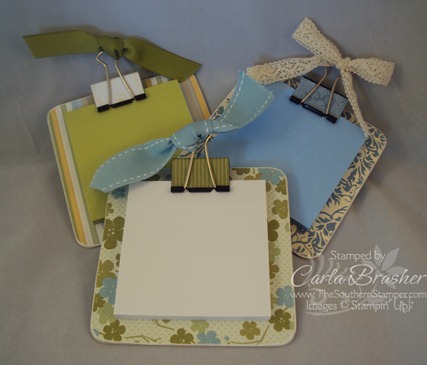
I've been hunting the web for new ideas for craft shows. Hopefully I'll be in two come March and was faced with the problem of what to fill the table with instead of, oh, Christmas ornaments...I know, what a thought. In my wanderings I came across these cute little Post-it note clipboards and had to try them myself.
Ridiculously cute, right?? Off to Staples I went to stock up on Post-it notes and binder clips (two of my favorite things). They're so, SO simple to make as well! Here's what you need:
  • chipboard or really stiff cereal box cardboard cut to 4"x4" for the base
  • pretty paper cut to 4"x4", two pieces for each clipboard
  • medium-sized binder clip
  • more pretty paper cut to 1.25"x2"
  • adhesive
  • sandpaper
  • ribbon
  • corner rounder or crop-a-dile
  • Post-its
From here, it's really simple. Take your chipboard and put a piece of the 4"x4" paper on each side, sticking it down with adhesive. While that dries/sits, cover your binder clip with the smaller paper strip tacking it down with adhesive on each side. Round the edges of your chipboard with your crop-a-dile, corner rounder, or scissors. Use the sandpaper to even out all the edges and give it a slightly rustic look. Clip the Post-its to the chipboard with your decorated binder clip, tie a ribbon on it, and you're done! Here's how mine came out:
I'd love to see how yours come out if you try the project! Happy crafting!


Here's where I'm linking up to this week:


Sunday, January 22, 2012

Say it with Conversation Hearts!

I was inspired by the Crafty Steals blog to try to make a card from a sketch...I think it came out rather cute:
After all, who says that conversation hearts are only for kids? A little paper punching, some ribbon, add a smattering of embossing, ink everything...tada! I simply used my own handwriting for the sentiments, in classic conversation heart red. What do you think? If you really, really must have one of you own I've got it up in my Etsy shop.

Ok, now I'm off to play with all the fun 'toys' I bought today...yay! The one nice thing about having a husband glued to the PS3 is that I get plenty of craft room time...mwahahahaha...

Happy Crafting!

Friday, January 13, 2012

Coffee Note Cards...with Fabric!


Well, it had to happen eventually - a post about coffee! It has finally snowed here for the first time since October (yes, you did read that correctly...don't ask) which means my favorite caffeinated beverage now needs to warm my hands while it keeps me going.

This summer I came across some awesome coffee fabric. I was drawn to it because 1) its coffee and 2) the pattern is rectangular. Usually for fabric crafts this is a deterrent (I really cannot see a skirt out of this) but for paper crafting it's perfect!
I simply had to have it and make cards out of it. To prep the fabric I (shudder!) ironed it out and then cut out some of the blocks. I then went back around them with pinking shears (the funny scissors that cut triangles) so that the fabric wouldn't unravel once on the card.
That's it! Now it's time to make some note cards!
What I used:
  • fabric cut with pinking shears
  • white card base, final size 4.25"x5.5" when folded
  • patterned paper cut to fit card front, 4.25"x5.5" (found at Joann's)
  • chocolate grosgrain ribbon, 1/2" wide x 4.25" long
  • blue cardstock (from stash)
  • sentiment stamp, "how've you bean?" (Fiskars)
  • StazOn Timber Brown ink pad
  • 1.5" square paper punch
  • adhesive
  • Xyron machine
  • ruler
  • paper cutter
  • scissors
Start by cutting the patterned paper to fit the front of your card. Ink up the edges, then attach to the card base using your adhesive. Ink up your sentiment stamp and stamp out a few onto your blue cardstock. Here's a good tip - stamp first, punch out second! That way you can line up your punch and make sure the sentiment is centered:
Stamp, stamp, stamp...
Punch, punch, punch!
Ink up the edges and then set aside to dry a little. Cut out your ribbon so that it fits the front of the card. I used my little Xyron sticker maker to apply the adhesive.
Nice and sticky!
Once everything is cut & dry, I ran the fabric squares and sentiment squares through my Xyron machine. They stacked nicely so that I didn't waste adhesive!
In they go...
All done!
Now, time to assemble. Attach your squares to where you want them on the card. Be careful, the fabric will try to stretch out of shape! Now stick your ribbon down, pop the sentiment square on top, and you've got a unique note card!

Have you ever combined paper with fabric? What was the result? Post your creations here, I'd love to see them!

Happy Crafting!

Wednesday, January 4, 2012

Homemade Coasters

It was a very handmade Christmas at our house. Not only was it a financially-sound option, but it was really satisfying to see someone really excited about gifts we made them.

For my sister and her fiance we made two sets of handmade coasters. Each set had four coasters and were actually very simple to make. We did one set with a monogram (luckily, their last names start with the same letter! It's even funnier that the same thing was true with my husband & I...lol) and the second set was with kitties & a puppy. They have several cats and a dog so it was fitting to give a nod to their furbabies as well.

So, how did we make them?

Warning: the photos came out awful! I had no idea until after the holidays, of course...sigh...

  •  4"x4" ceramic tiles that we found at Lowe's for $0.16/each
  • Mod Podge, matte finish
  • spray Mod Podge, matte finish
  • 3/4" felt furniture circles, 4/tile
  • foam brush
  • 4"x4" design*
*for these personalized tiles I made up my artwork in Photoshop, but you could easily use scrapbooking paper as well

Trim up your paper to 4"x4" and set aside. Lay out your tiles on a covered surface and get your Mod Podge ready. Lightly coat your first tile with Mod Podge and carefully lay your paper over the top. Smooth it out to remove all the bubbles and set aside to let dry. Keep smoothing bubbles around the edges as needed while it dries and don't be afraid to go back in with your finger and more Mod Podge to tack it all down. Continue for all of your tiles and let them all sit & dry.

Once dry, give them a second coat of Mod Podge. Once that coat is dry, spray them all with the spray Mod Podge to give it a sealant against spilled liquids...coasters do seem to attract those. (ba-dum-bump) Once everything is dry (we let them sit for a day or so), apply the felt circles on the bottom to give them that non-skid goodness we expect from coasters. Ta da, beautiful handmade coasters that didn't break the bank!
Monogram coasters with the letter 'L'
 
Kitty and puppy coasters
If you're Photoshop-savvy, here's how you make the custom artwork: open a new file and size it to 4"x4". Let your creative self go crazy! You can fit four printouts on a standard letter-size sheet for printing ease. I used a lightweight cardstock and I would not recommend going heavier.

Where did I get the idea for making coasters? Pinterest, of course! I am truly loving that site...all crafters should hang out on there. Feel free to follow my boards on there for inspiration of your own! If you do make coasters, please let me know so I can see how they came out.

Happy Crafting!

Monday, January 2, 2012

Happy 2012

Another New Year is here! I generally do not make resolutions (you won't find me buying gym memberships or exercise equipment) but I did promise myself to make time for blogging this year. Hopefully I can get a good pile of posts going to help me keep that promise!

Today I'm sharing with you one of the Christmas cards I sent out this year. (Note to self: this year, start making Christmas cards in July!)  I really wound up in a time crunch with my personal cards this year, so I was looking for elegant but quick & easy!

I had found a card idea I really liked over on Pinterest (which if you're not a member of, join! It's a great place for ideas.) so I looked through my board and found it again. 

I really liked the snowflake, the layers, the stitching, and the simplicity of the card. Beautiful but rustic, natural but with a 'wow' factor.

Sadly when I first think about a card design based on a sample card, I try to recreate as much of the original as possible. Some day I'll learn! I just wind up driving myself crazy when I do that and then the card isn't me. So after some storming around the craft room, I came up with my own design that is me and that I was proud to send out to our friends and family.


The layered effect I liked is still there with the black cardstock, ivory parchment, and the green plaid all placed on top of a deep red base card. The snowflake is there (my favorite part) and the stamped sentiment of Merry Christmas. Perfect!

So, what did I use?


  • brick red paper from my stash, cut to 11"x4.25" and folded in half to 5.5"x4.25"
  • black Bazzill cardstock from my stash, cut to 5"x4"
  • ivory parchment paper from my stash, cut to 4.75"x3.75"
  • green plaid paper from my stash (seeing a trend?), cut to 2"x2"
  • EK Success Large Snowflake paper punch
  • StazOn ink in Timber Brown
  • sentiment stamp
  • We R Memory Keepers Sweetheart Inkers in green & white
  • adhesive
Yup, this card was made entirely of things I already owned! How cool is that? The Sweetheart Inkers are brand new and are AWESOME. I actually won them over on the Captured Moments blog (they're my local scrapbooking store and I adore them). This was the first project I used them on and they were so easy to use.

Back to the card - start by cutting all of your paper to size. I wound up making 16 of these (I ran out of the plaid paper!) and doing them assembly-line style was the way to go. After cutting, fold up your base cards (if you're using pre-made ones you can obviously skip this step, but I like making my own). Punch out all of your snowflakes from the ivory parchment paper. (I kept the punches for some future project, of course!) Ink all of your edges to allow them time to dry before assembly! I used the white Sweetheart Inker on the black paper and the green on the parchment paper.

Now for assembly! The green plaid paper was attached to the back of the ivory parchment. Ivory parchment goes on the black cardstock, then the whole stack onto the brick red base card. Stamp the sentiment of 'Merry Christmas' and it's done!

This design can easily be used for any punch, any holiday. If you use it as an idea card, be sure to come back and tell me what you made!

Happy Crafting!


Thursday, August 25, 2011

Party Hat Invitations

As I wave goodbye to over 100 cards heading out to a craft show in Vermont, I finally have time to start crafting for myself again (and blogging about it!). Hard to believe that a year ago this time I was very pregnant and now I'm planning my son's first birthday party! Where has the time gone?!?

Naturally I'm taking on the task of making the invitations myself (the joys & trials of being a paper crafter) and inspiration struck when I saw the latest email from Scrapbooks Etc. featuring this card which shall now be referred to as the inspiration card. I loved the playfulness of it and headed off to the craft store to recreate it.

My original plan was to stay very close to the inspiration card - polka dot paper, bumbles on the bottom, button top. Hah! Not only could I not find polka dot paper but the cost of the bumbles was obscene. I'm only doing 20 invitations, but when one spool of bumbles costs $3.50 and only gets you 4 cards...um, NO. As I stood there fretting over what to do now, my husband looks at me and says "how about plain paper and fun ribbon?" Well heck, why didn't I think of that?!? Creative burnout, that must be it...did I mention the 109 cards?

So off my genius husband and I went to the ribbon aisle (I showed him where it was, regaining some crafty points) and he found a cute spool of polka dot ribbon. We took it back to the scrapbook paper aisle where he picked out some dark teal paper to complement the ribbon, handed it all to me and said "here, do your thing!" Ok, he also created a template out of scrap paper I had printed coupons on so we could figure out how many cards we could get from each 12"x12" sheet and what was a good size base card. It's nice to have a husband who can think creatively, too.

The rest, however, was now up to me. Raiding my mother's button collection (this is a perfect craft for all those buttons you have laying around!) I now had the last ingredient I needed for some adorable party invitations.

What I used:
  • dark teal 12"x12" card stock
  • yellow 12"x12" card stock
  • green 12"x12" card stock
  • spool of polka dot ribbon
  • spare buttons no more than 3/8"
  • 1-1/2" circle punch
  • Cricut to make the number 1's (from George & Basic Shapes, 2" tall)
  • chalk to ink the edges 
  • adhesive
  • paper cutter and/or scissors
  • word processing software to create the wording

My first step was to create the actual invitation wording for the party. For this I used Publisher, created a new page size, and added a triangle shape to stay inside of. I didn't want the wording to fill the entire inside of the card, so I made it about 1/2" smaller than the card. After setting up my shape it was a simple matter of staying inside the lines, choosing colors that complemented the card design, and printing them out on white card stock. I was able to get four invitations to a page which was great. Using as little paper as possible always makes me happy.

Those swirlies are me preventing party crashers...;) I printed this one on scrap paper which is why it looks, well, blah.
Now it was time to start making the party hat. Taking the teal card stock I cut the sheets into four 6"x6" squares. The square was then folded on the diagonal making a triangle, but not the type of triangle I wanted.

Using the point on the unfolded side I drew a line across the bottom and cut off the extra. Now it looks like a party hat!

Next I inked all the edges and the crease on the hat. You don't have to do this, but I'm an edge-inking addict and couldn't help myself.

While the edges dried I set up my Cricut to start cutting number 1's out of the yellow card stock. With the machine cutting away I set to work punching out circles. Amazingly enough they were done pretty fast and I inked all those edges before setting them aside. What, I told you I'm addicted...

Next was cutting the ribbon into lengths. I made each strip just a little larger than the bottom of the card to leave room for trimming it down to the angle of the card. My buttons didn't need anything (I decided not to make that huge, crazy bow) so now I was ready to start assembling!

Taking my card I attached the invitation wording to the inside with my adhesive.

Back on the front of the card I added the ribbon along the bottom and trimmed the ends to the shape of the card.

The circle went in the middle with the number on top. Adding the button on the top point I was done!
Hmm, now where did that number 1 go...?
Just 19 more to go...best part is that now the card fits nicely in a standard envelope, so no added postage!


Had I stuck with the bumbles on the bottom as in the inspiration card, something tells me they wouldn't have survived the post office.

Let me know if you try this yourself - I'd love to see pictures! Happy Crafting!