Showing posts with label handmade. Show all posts

Friday, October 25, 2013

Double, Double Toil and Trouble

Anyone who follows me on Instagram or Facebook will remember that yesterday I posted a teaser of spooky things to come:
Ghosts and owls and bats and spiders, oh my!
I have the joy of belonging to an art group locally where every couple months we get together and just CREATE. Tonight we meet again, and our "homework" was to alter a witch's hat and Tim Holtz clock. Tragically, the clock is barely started. I blame the fact that my boys want clean socks and spoons. Obviously they've become spoiled...my witch's hat, however, I'm bringing with me tonight to show off and I love it!
The really scary part is that messy craft table!
Oh this was a fun project! The base was a plain, kraft colored witch's hat ready for finishing. The top half of the hat I covered in 1" strips of scrapbook paper using Modge Podge. The brim was then coated in Modge Podge and topped with a glitter mixture I made myself; black, deep purple, and lime green all mixed together. I then hid my paper ends with some black grosgrain ribbon.
My little rat familiar
Once everything had dried, I added on my little rat friend here. I found him at Joann's and I love him. There's just something about rats and Halloween that just seem to go together. His little paws got glued down to the hat brim with the help of some 3-in-1.
My stylish owl familiar
Then I found my owl at Michael's. It's an owl. Wearing a top hat. Um, YES! His feet got tacked down with 3-in-1 as well, and he's so stinkin' cute. I think he and my little rat friend need names.
Boo! Meow!
Of course, since it's my hat, I had to have a Halloween kitty on it. There's little Salem, hiding behind the ghost tag ready to pounce!
Spoooooky Halloween tags
Speaking of those tags, are you loving them as much as I am? I inked up two of the freebie tags Unity loves throwing in with their orders. The large one is a mix of Concord Grape and Black Soot Distress Inks and the little one is Peeled Paint, Wild Honey, and Black Soot. The images were stamped with Black Soot as well, then when they were dried I added in liberal amounts of Rock Candy Distress Paint. I love how grungy and spooky they turned out! The ribbon I had stashed in a drawer and looks like it once came from the dollar bins at Target. Some Glue Dots holds them down nicely.
Scary spider bling
Finally, I added spiders; big, blinged out, spiders and their web. Yeah, they're pretty awesome.

I cannot wait to see what the other ladies came up with tonight! It's bound to be a good time. I'm linking up to Unity Friends With Flair.

Happy Crafting!

Wednesday, August 29, 2012

My Creative Time Challenge - Pinterest Inspired Project

Good morning everyone! After my craft show last weekend I decided to take a crafty-vacation and make things that I WANTED to make, as opposed to things I NEEDED to make for the show. It's going to be a short craft-cation, though, as I have two more shows next weekend! Eek! As part of my craft-cation, I decided to play along with My Creative Time's new challenge of making a Pinterest Inspired Project.

Piece. Of. Cake.

It helps that I'm completely addicted a frequent browser of Pinterest (you can find me under caffpapercuts). Seeing as I currently have Halloween on the brain, I decided to try one of the rolled-paper wreaths I had pinned. It looked easy and they even gave directions. So I cut up my Halloween papers using some My Mind's Eye pieces I got in a multi-pack and filling in with my own stash of black card stock and some pretty orange shimmer paper leftover from a wedding invitation order. I rolled them all up, glued them into the cones, then started work on laying them out.

Then I worked some more.

And more.

Then the muttering & cursing started.

I consider myself a skilled individual, but for the life of me I could not recreate the sample wreath with the materials they listed. The closest I got was half a wreath which made no sense as I was following the freakin' directions!!

So, I did what any reasonable crafter does at this point - threw the directions out the window and made something that made ME happy! I made a few more cones out of my black & orange card stock and made a fun, fan-shaped wreath. I used a half-circle cut out of a cereal box for the backer to give the cones something to hold on to and added twine for hanging. (Note to self: next time, add twine before you glue everything!) The middle is made from a 4" circle cut from the same cereal box and covered in Halloween print...I believe it's one of the ones from the Target dollar bin. Topping it all off is a chipboard Halloween kitty that I attached with foam tape for dimension.

My finished wreath on my lovely green wall

Side view so you can see the layers and dimension
Close-up of my Halloween kitty...meow!
So, what do you think? I'd love to hear some feedback! Any of your projects get completely changed about halfway through like mine? Please share!

Happy Crafting!

Tuesday, July 3, 2012

Christmas in July on Etsy! Featured Shop: CharmsbyDiana

Welcome to Day 2 of our Christmas in July on Etsy shop specials! With a random mouse-click, today's featured shop is Charms by Diana.


I had never visited Diana's shop before, but right away I was taken in by her lovely banner and gorgeous bridal jewelry! Wow!

White twisted pearl 18 inch Swarovski pearl necklace
That necklace is absolutely stunning. If I were marrying my husband again, I'd probably put it on the short-list of what to wear. Her shop doesn't stop there, though. She also has adorable wine glass charms...I might have already added 2 to my favorites. Good thing, too, as they're Buy One Get One Free for her Christmas in July sale!
Nautical Wine Glass Charms, Set of 8
How cute are these?? Admittedly I'm quite partial to the beach, especially since I'm packing for our vacation there right now! (Gotta love the power of scheduling your blog posts.)

For a second pair, I'm totally thinking of these pretty, classic Christmas ones. I do so love Christmas!
Christmas Wine Glass Charms, Set of 8
But her store doesn't end there. She also has little cupcake toppers! Eeek!
Cake Topper Cupcake Parasol Set of 12 in Baby Blue
Seriously, how cute would these look at a baby shower? She has colors for various occasions and even does custom orders.

So, to summarize today's shop:

Charms by Diana
Handmade Bridal & Fashion Jewelry, Party Supplies & More

Select items are marked down or BOGO plus free shipping worldwide if you use coupon code CIJ2012 on all purchases in July. All wine charms are BOGO!

Go, shop, find pretty things, and tell Diana that Caffeinated Papercuts sent you! <3

Please note: I have not received compensation in any way to write about this shop. All views are my own personal ones and not from a script. I'm just that opinionated.

Tuesday, May 29, 2012

Prepping for the Craft Show, Part 1

Craft show season is upon me once again! So while the weather was gorgeous this weekend, I was working away on the porch (out of the sun!) on the latest batch of Modge-Podge projects. :)

I love how well my tile coasters come out (and honestly, how well the sell at the shows!) so I was working away making more of those. Gotta keep those designs fresh! My almost-brother-in-law had the great idea of making trivets as well to coordinate with the coasters so I'm giving those a try this time as well.

I started off upstairs during nap time cutting up all my new papers. I have to say, the new Recollections pads from Michael's are ADORABLE!

Small squares are coasters, larger ones are trivets

Aren't they pretty? I love how well they cut up and coordinate
I'm such a sucker for nature prints
After slicing & dicing, outside I went to start putting them on my tiles. They're looking so pretty!

Yes, you DO see clothespins in the back! I FINALLY found the large clothespins again!!! Yay!!! They got decked out in fun kitchen-y paper and will have their recipe cards added to them soon. I haven't seen any of them in my local stores since January. It's been killing me not to have them!

After all the clothespins and trivets dried up, it was time to work on the coasters. It's so nice being able to be outside - everything dries so fast!
How do I know when I have enough coasters? When the table is full!
Other angle. I love the new patterns!
Ok, time to hit 'play' on the Cookie Monster DVD again...or so I'm told. :) Besides, I need to get back to work on magnets!

Happy Crafting!

Saturday, May 19, 2012

Butterfly Note Cards

Finally, a chance to write up a post while the little one throws Legos at my feet...no, really, there went another one. Problem is that I've been crafting a lot lately but haven't had a chance to sit and share them. Ah that delicate balance...especially when using the laptop usually involves a very squirmy toddler wanting to use it, too. :/ Sigh.

Enough about that, let's talk about butterflies! I came across this card on Pinterest and loved the simplicity; the butterfly, the tone-on-tone writing in the background. Swoon. Of course I don't have a stamp that I could do the writing with so it got shelved but not forgotten. Then I came across this card showcasing a double stamping technique with acetate (aka transparencies). Major swoon. Still wanted my paper with writing, though...and then I walked through Michael's and found their new pads of Recollections paper. I might have squealed with glee. Just a little bit.

So what did I make? Take a look:


 Isn't it just adorable?? I really love how it came out. I made them smaller than the usual A2 size, these little cuties are 3.5"x4". Bonus there is that you can get three cards from just one piece of 8.5"x11" paper! Here's a closer look at the butterfly, acetate, and pearl accents (they needed a little bling).


So. Darn. Cute! I stamped the butterfly onto the patterned paper (look, there's the script I wanted!) then stamped it again onto acetate. I carefully cut the acetate butterfly out and used my bone folder to make the wings turn up. I just ran it along the body of the butterfly until it looked right. A little adhesive, and voila!

Of course, I couldn't stop at just one...


Hey, I had to try out all the colors! Besides, they would be lonely if they didn't have friends. Really.

Supplies are listed below, and they set of 3 amazing butterfly cards are listed in my shop. They'd like a good home, please!

Supplies: Queen & Co. pearls in Grass Green, Classy Red, & Sunflower yellow; Recollections Paper 'Habitat'; transparencies; Staz-on jet black ink; butterfly stamp; Versamark chalks

Happy Crafting!

Wednesday, April 11, 2012

Lawnscaping Challenge - Coloring, part 1

Whee...now on from Easter cards to a different kind of spring time renewal: babies! Seems like many of my family and friends are having them at the moment. Not only did my sister-in-law make me an Auntie right before Easter, but a friend of the family is due in July as well! More boys for my little boy to play with, yay!

Of course, I had to start with a girl card just to get it out of my system:
I stamped the background using the Lawn Fawn Plus One set and colored them all in with watercolor pencils. I layered some green shimmer paper scraps around the edging to create a binding and have it look like a little baby blanket. I made stitching with a white gel pen, but you really can't see it. Boo. Next time, darker gel pen. The little stroller is from Plus One as well and I colored it up to match the blanket colors. So sweet and girly...with no girls to give it to!
Come see all the entries over on the Lawnscaping Challenge blog. I'll brb with my little boy card!

Welcome to the First of Many Posts Today!

Oh yeah, lots and lots of posts today! I'm entering several online challenges with several different cards...and each one needs its own post! Oh yeah, and most have a deadline of today...eeek! Ready for some creative overload??

First up is the CAS-ual Fridays weekly challenge!
It's all about what you'd find in your bunny basket come Easter morning. I came up with two different cards for the challenge. We'll start with my favorite of the two, and the one I actually gave to my sister & her fiance for Easter. Problem is, I'm not sure if it would be defined as "clean and simple". Any thoughts??
I love this card. I couldn't find a bunny die anywhere, so I wound up finding a template and making my own. That seems to be this year's theme; they don't make what I want, so I'm making it myself! I visualized the patterned paper as wallpaper and have them sitting on a table...the scalloped edge is the tablecloth. Get it? The bunny eyes are just brads with some coloring done to them so they look like those classic chocolate rabbits. Yum...
Everything got inked up and I wrote out the speech bubbles myself. Obviously this is why I took drafting in high school, right? ;)

Back soon with more cards!

Sunday, April 1, 2012

Peep...peep...nom!

Wow, I have been seriously MIA...two craft shows in a month will do that I suppose. I come bearing a super-cute card, though! Seeing as Easter is right around the corner, I just had to make up some cards. Around here, nothing says Easter like yummy chocolate Cadbury eggs and loading up my Gram with Peeps! She adores the little sugary things almost as much as I adore coffee. I went looking for a Peeps pattern, digi-stamp, anything I could use to start a card with. What did I find? Nothing. Nada. Zip. So after saying a few nasty things about the industry, I made my own. So there.


Isn't he yummy?? I made a whole flock of these little guys (and some bunnies!) and brought them to my craft show Saturday as well. Several went off to good homes. :)

All of the paper was from my personal horde collection. I love square cards but loathe the extra postage, so I made this one 4.25"x4.25". Yup, still fits in a standard A2 envelope. Yes! I fussy-cut the Peep out after coloring him in with watercolor pencils, then gave him a sugary topping with some extra-fine glitter. The teal twine is the gorgeous new twine from Lawn Fawn. Love. It.

If by some chance you absolutely have to have one (and don't feel like making it yourself), I do have it up in my shop!

So, what are everyone's Easter plans? Please share!

Happy Crafting!

Thursday, March 8, 2012

Craft Show Season is Coming...

...and boy am I not quite ready! Yes, that's where I've been instead of blogging: locked in the craft room coming up with items to replace all of my holiday things. Somehow I don't think people want to buy Christmas ornaments in March...I could be wrong, but better to play it safe. I've been scouring the web for cute ideas and collecting them on my Pinterest board. Of course, the time has come to stop collecting and start making, especially since the first show of the year is this Saturday!  Eeep!

So while I'm about to head upstairs and start assembling magnetic grocery lists, here's a peek of what my dining room table looked like Tuesday:
Of course that's my coffee cup. Like I craft without it?!?


Yup, tile coasters! I made up an entire case of them (one case = 80 tiles). There they sit, drying, hoping that no kitty or toddler gets their grubby paws on them. (Thankfully they were safe, but it was a valid concern.)

Closer shots of the patterns (yeah, they're not great, but it was my camera phone into direct sunlight. Give me some credit!)
One half of the table...
...second half of the table
They came out really cute. Now hopefully they'll all get nice homes on Saturday! If you're in the area, stop by the Johnstown High School and adopt a few sets, hmm? :)

Ok, off to play with grocery lists and Modge Podge...erm, though not together.

Happy Crafting!

Tuesday, January 31, 2012

Take a Note!

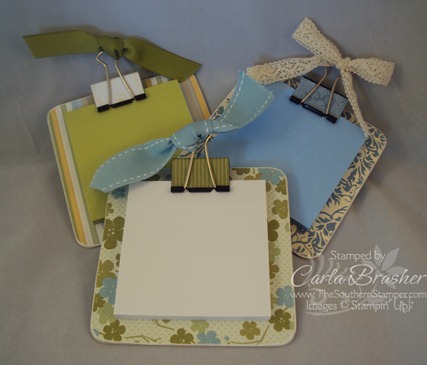
I've been hunting the web for new ideas for craft shows. Hopefully I'll be in two come March and was faced with the problem of what to fill the table with instead of, oh, Christmas ornaments...I know, what a thought. In my wanderings I came across these cute little Post-it note clipboards and had to try them myself.
Ridiculously cute, right?? Off to Staples I went to stock up on Post-it notes and binder clips (two of my favorite things). They're so, SO simple to make as well! Here's what you need:
  • chipboard or really stiff cereal box cardboard cut to 4"x4" for the base
  • pretty paper cut to 4"x4", two pieces for each clipboard
  • medium-sized binder clip
  • more pretty paper cut to 1.25"x2"
  • adhesive
  • sandpaper
  • ribbon
  • corner rounder or crop-a-dile
  • Post-its
From here, it's really simple. Take your chipboard and put a piece of the 4"x4" paper on each side, sticking it down with adhesive. While that dries/sits, cover your binder clip with the smaller paper strip tacking it down with adhesive on each side. Round the edges of your chipboard with your crop-a-dile, corner rounder, or scissors. Use the sandpaper to even out all the edges and give it a slightly rustic look. Clip the Post-its to the chipboard with your decorated binder clip, tie a ribbon on it, and you're done! Here's how mine came out:
I'd love to see how yours come out if you try the project! Happy crafting!


Here's where I'm linking up to this week:


Sunday, January 22, 2012

Say it with Conversation Hearts!

I was inspired by the Crafty Steals blog to try to make a card from a sketch...I think it came out rather cute:
After all, who says that conversation hearts are only for kids? A little paper punching, some ribbon, add a smattering of embossing, ink everything...tada! I simply used my own handwriting for the sentiments, in classic conversation heart red. What do you think? If you really, really must have one of you own I've got it up in my Etsy shop.

Ok, now I'm off to play with all the fun 'toys' I bought today...yay! The one nice thing about having a husband glued to the PS3 is that I get plenty of craft room time...mwahahahaha...

Happy Crafting!

Saturday, January 21, 2012

Lawnscaping Challenge #26 Winter Wonderland

Where has the week gotten to?? We finally have snow here which helped with my inspiration for this week's Lawnscaping Challenge. Of course between snowshoeing, helping a friend build a deck (I was the only one he trusted to cut 45 degree angles on the miter saw - go me!), general running around, and spending some quality time in the craft room here it is Saturday already and I'm just sitting down to write!

So this week's challenge was Winter Wonderland, something that has finally happened around here! I was really excited about this one. My Christmas present to myself this year was a Sizzix Big Kick and a bunch of cartridges that were on deep sale on Black Friday. My husband was thrilled because then he had an easy time shopping for me this year...hehehe... I had picked up one of the snowman cartridges (cartridges? punches? someone correct me if my terminology is off, please!) and a snowflake embossing folder. Better still, the Lawn Fawn Ornate Ornaments stamp set that I have includes a snowflake stamp - perfect! Put them all together and see what you get:
Isn't he adorable?? I love how he came out. Here's how it started out:
What I used:
  • white linen cardstock (paperandmore.com)
  • purple striped scrapbook paper (my stash)
  • brown cardstock (stash)
  • black cardstock (bazzill)
  • purpley/bluey cardstock, cut to 5.25"x4" (bazzill)
  • orange metallic cardstock (paperandmore.com)
  • white glitter cardstock (Joann's)
  • ivory linen cardstock, measures 5.5"x4.25" when closed (paper and more)
  • Memento Paris Blue ink
  • dark gray rhinestones, two sizes (Michael's)
  • clear Stickles
  • silver Stickles
  • Lawn Fawn Ornate Ornaments stamps
  • Spellbinders snowflake embosser
  • Sizzix snowman cartridge
  • glue
  • Zots 3D
Start off by making your card base. Emboss the purpley/bluey cardstock with the snowflake background and attach to the base card. Cut a piece of the white glitter cardstock to fit across the entire width of the card, then freehand cut it to make it look like a snow mound (I had this piece left over from cutting out larger snowmen). Attach it to the front of the card as well. Using the little snowflake in the Ornate Ornaments set and the Paris Blue ink, make some snowflakes floating down from the sky.

Cut out the snowman using the Sizzix cartridge. This is where the rest of the paper is used! You could probably use fabric for the scarf as well, but I loved this pattern for a scarf. To assemble and attach him I used glue on the scarf, carrot nose, and arms to attach them to the snowman. I then used the 3D Zots to attach the snowman to the card, putting him where I thought he looked cute on the snow mound. One last Zot for the hat right onto the card and he was assembled!

I then went back and decorated the hat with the silver Stickles and the snowman with the clear Stickles, just to give his snow some sparkle. Rhinestones for his eyes and buttons and we have a snowman!
On the inside I simple wrote "Thanks 'snow' much!" for a sentiment and the card was done! It was nice to build a snowman inside where it's nice and warm.

Have you built any real or paper snowmen lately? I'd love to see them!

Happy Crafting!