Showing posts with label paper crafting. Show all posts

Friday, July 25, 2014

Mountain Plains Crafters Christmas in July Blog Hop!

Happy Friday everyone! Welcome to the very first Mountain Plains Crafters blog hop! Have you been loving everyone's designs so far? Seeing as I'm a sucker for Christmas cards no matter what time of year it is, I absolutely loved this theme. Oh quit your grumping about the fact that it's July, aren't the prizes worth it? Think of all the ideas you'll have for your own cards this year, especially if you win that fantastic Clearsnap set of the same goodies we used! You have until midnight on Saturday the 26th to enter. ;)

You should be arriving here from my dear friend Debra's blog. Here's a quick reminder of our participants:

Caffeinated Papercuts~Jennifer <<< You are here!

I was so excited when I got my pack of goodies in the mail from Pam (especially since she tucked in that lovely paper, too; I can't wait to use it!). Be sure to go give our friends at Clearsnap some Facebook love for sponsoring this hop! Be sure to tell them Mountain Plains Crafters super-awesome design team sent you. ;)
Smooch Bottle in Spruce, ColorBox in Saddle, Smooch Spritz in Cashmere
Let's face it, the colors were begging to be used on a holiday card and I was more than happy to oblige. I started playing around with the pine cones from Lawn Fawn's Ornate Ornaments set and the Saddle ink to make a really fun, rustic background using kraft paper. The card evolved from there, and this was the end result:


I used the Smooch Spritz on my new pine cone paper to add some shimmer and shine, then let that dry and went to work on the vellum sentiment banner.

So rustic...so shimmery!
To continue the rustic, woodland feel I grabbed my Gingham Christmas Greetings set from Unity Stamp Co. and inked up the 'happy holidays' sentiment with Memento Cottage Ivy ink. Once dry (vellum = longer drying time, fyi) I taped it to the back of my pine cone paper then went to town with my Crop-a-Dile and some eyelets, then tied some twine through them. I used foam tape to add the panel to my card base, then hand-sketched some holly leaves to color in with the Smooch ink. A bit of Perfect Pearls for berries and this card was done!


Still with me? Good, now lean in close...want to win a Unity Itty Bitty stamp? I have a pile of duplicates on my craft table and I'll be pulling one out for a lucky winner! Just use the Rafflecopter below to enter; contest closes Saturday, July 26th at midnight. Please note; this is Jen giving away a stamp, not Mountain Plains Crafters.

a Rafflecopter giveaway
All right, now go see what Christina has created for us; I bet it's awesome!

Happy Crafting!

Wednesday, June 4, 2014

Growing in Unity Day 3 - Dance to the Song in your Head

Happy Wednesday everyone - welcome to Day 3 of my GIU fun! I'm the Growing in Unity gal this week over on the Unity Stamp Co. blog, which means I'll be sharing a project created with my Unity stamps with you every day. I invite you to come back each day and leave a comment for a chance to win your choice of (2) Itty Bitty stamps! Woohoo! If you're new to my blog, I'd love it if you became a follower and join in the fun over on the Caffeinated Papercuts Facebook page. :)

Today, I have a card with sequins. Yes, I'm sure you're all amazed. I did change it up a bit, though, and added in some sweet coloring as well. ;) I love the Angie's girls line, and when Whitney was introduced, it was love at first sight.

unity stamp co whitney girl spectrum noir markers pretty pink posh sequins paper craft coloring

Here's a little secret; I've never taken a coloring class. I'm not Copic certified or anything like that; heck, I don't even use Copics! I colored Whitney here with my Spectrum Noir markers, and this was the first time that I sat back when done and went 'holy cow, maybe I CAN color!' I'm self-taught by way of YouTube videos and other crafting blogs, and I think all of my practicing is finally paying off.


Admittedly, I made her look a bit like me. I don't know about you, but I would soooo wear those shoes!


I absolutely love this quote that comes with her. After coloring Whitney, I fussy-cut her out then went to town paring up several different papers from a MME 6x6 pad. I love mixing patterns together, and using the gray floral and black patterned as neutrals was just the ticket here. And, of course, I used more Pretty Pink Posh sequins to finish off the edge of the card.


I popped up the sentiment and Whitney with foam tape for some height and this card was done. Honestly, I'm thinking of keeping her; think she'd look good on the craft table?

Thanks for stopping by today; see you tomorrow for Day 4! Until then, Happy Crafting!

Monday, June 4, 2012

June Out of the Box Sampler and Giveaway Information!

Over on Etsy is a team called the Out Of The Box Sampler, or OOTBS for short. Each month small business on Etsy get their handmade items together and send them in to Michelle to package them up into boxes of absolute fun! There's a different theme each month and some months have a special box with a special theme, usually around holidays. June is one of those months with a special Men's Father's Day Sampler Box coming out today!

Seeing as I'm insane always looking for a new challenge, I signed up to create 100 special, limited edition greeting cards just for the Men's Father's Day Sampler Box. Seeing as they go on sale tonight, along with the regular June box of Hollywood Glitz & Glamour Girl, I thought now was the time to reveal what our cards look like! Ready?

 
One each of the color combos and sentiment stamps

I really, really love how they came out. The stamp set is from Unity Stamp Co. and is really perfect for any dude in your life. There are 5 sentiments with the set, so I used each one 20 times. I then scattered those across the 6 different background paper & shirt combinations I made, which you can see here. There were a few here & there that were a different combo, but you get the idea. Lots of cutting, inking, stamping, and more cutting went into these! They were then topped off with some very manly twine and layers of dimensional dots. Each box will contain one of these manly cards. I call them limited edition as I am OUT of the paper I used for all the backgrounds! So even if I do these again, they won't be the same.

Here are some close-ups of the various colors:

Brown stripes with ivory shirt & green diamonds with ivory shirt

Dark brown stripes with green shirt & yellow diamonds with purple shirt

Green plaid with yellow shirt and wood grain with blue shirt...and the shadow of me taking the photo!
You can see all the different sentiments used as well: the man, stud, my guy, father, my dad. I like how they would work for your father, husband, brother...really any guy!

One last close-up, this one showing all the dimensional layers:
The shirt, frame behind the shirt, and sentiment are all popped up
Have I convinced you that you simply must have one? Ok! Here's where you can go tonight, June 4th, to buy a box: OOTBS Team Shoppe. If you're curious to see what else is in the box, check out the list of participating business on the OOTBS website.

I know this is a really long post, but for hanging in there with me here's the fun part: we're almost to 100 'likes' on FB! If you haven't already, head on over to the Caffeinated Papercuts FB page and give us a thumbs up. Mention that you found us via the blog, it makes me feel warm & fuzzy to know that someone is reading it. :) Once we hit 100 'likes', there's going to be a GIVEAWAY! Woohoo! Who knows, maybe one of these cards will be in it...hmmm...

Ooo, baby's asleep! I'm off to craft - later!

Saturday, May 19, 2012

Butterfly Note Cards

Finally, a chance to write up a post while the little one throws Legos at my feet...no, really, there went another one. Problem is that I've been crafting a lot lately but haven't had a chance to sit and share them. Ah that delicate balance...especially when using the laptop usually involves a very squirmy toddler wanting to use it, too. :/ Sigh.

Enough about that, let's talk about butterflies! I came across this card on Pinterest and loved the simplicity; the butterfly, the tone-on-tone writing in the background. Swoon. Of course I don't have a stamp that I could do the writing with so it got shelved but not forgotten. Then I came across this card showcasing a double stamping technique with acetate (aka transparencies). Major swoon. Still wanted my paper with writing, though...and then I walked through Michael's and found their new pads of Recollections paper. I might have squealed with glee. Just a little bit.

So what did I make? Take a look:


 Isn't it just adorable?? I really love how it came out. I made them smaller than the usual A2 size, these little cuties are 3.5"x4". Bonus there is that you can get three cards from just one piece of 8.5"x11" paper! Here's a closer look at the butterfly, acetate, and pearl accents (they needed a little bling).


So. Darn. Cute! I stamped the butterfly onto the patterned paper (look, there's the script I wanted!) then stamped it again onto acetate. I carefully cut the acetate butterfly out and used my bone folder to make the wings turn up. I just ran it along the body of the butterfly until it looked right. A little adhesive, and voila!

Of course, I couldn't stop at just one...


Hey, I had to try out all the colors! Besides, they would be lonely if they didn't have friends. Really.

Supplies are listed below, and they set of 3 amazing butterfly cards are listed in my shop. They'd like a good home, please!

Supplies: Queen & Co. pearls in Grass Green, Classy Red, & Sunflower yellow; Recollections Paper 'Habitat'; transparencies; Staz-on jet black ink; butterfly stamp; Versamark chalks

Happy Crafting!

Saturday, April 14, 2012

Sparks Challenge!

I had some time before I had to post for the next challenge so I didn't smoosh this one in with all the others I posted on Wednesday. While I, of course, didn't win anything it's nice having inspiration coming from another source like a challenge.

Now then, check out this simple little card I made with some ribbon, Paper Smooches stamps, and...shhhh...an Itty Bitty stamp from Unity. Turns out I don't have any sentiment stamps from Paper Smooches. Oops. But isn't this stamp from the Potpourri collection awesome?? I love being able to build my own backgrounds!
Potpourri Collection from Paper Smooches, 'Happy Birthday' from Itty Bitty, orange grosgrain ribbon
I can see doing this card in lots of different colors with many different sentiments. How easy would it be to make it masculine or feminine?? Yes!

View from above

The Paper Smooches Sparks challenge is going on now! See what you get inspired to make.

Happy Crafting!

Wednesday, April 11, 2012

Lawnscaping Challenge - Coloring, part 2


All right, here's the baby boy card I made for the challenge. This one I can easily use and will probably give to the expectant mom due in July for her baby shower. So many little boys around these days!
I used the Lawn Fawn Plus One set for this card, too. It's just such a cute set! I stamped up the background then colored it in with my watercolor pencils using sweet little boy colors. (Look, you can see the gel pen stitching this time!!) I mirrored the colors for the stork's bundle and the stitching around it, then topped it with the sentiment flag. The teal twine is from Lawn Fawn's new set of goodies...it's really awesome to work with.

All right, I think that's it for today. I'll be back tomorrow with my card for the Paper Smooches challenge!

Happy crafting!

Second card for CAS-ual Fridays

All right, here's my second attempt at a CAS Easter basket card.
I just sliced up some squares of card stock, stamped on some cute Easter eggies, and popped them off the card base. I think they came out rather sweet.
Come play with everyone over at CAS-ual Fridays!

Sunday, April 1, 2012

Peep...peep...nom!

Wow, I have been seriously MIA...two craft shows in a month will do that I suppose. I come bearing a super-cute card, though! Seeing as Easter is right around the corner, I just had to make up some cards. Around here, nothing says Easter like yummy chocolate Cadbury eggs and loading up my Gram with Peeps! She adores the little sugary things almost as much as I adore coffee. I went looking for a Peeps pattern, digi-stamp, anything I could use to start a card with. What did I find? Nothing. Nada. Zip. So after saying a few nasty things about the industry, I made my own. So there.


Isn't he yummy?? I made a whole flock of these little guys (and some bunnies!) and brought them to my craft show Saturday as well. Several went off to good homes. :)

All of the paper was from my personal horde collection. I love square cards but loathe the extra postage, so I made this one 4.25"x4.25". Yup, still fits in a standard A2 envelope. Yes! I fussy-cut the Peep out after coloring him in with watercolor pencils, then gave him a sugary topping with some extra-fine glitter. The teal twine is the gorgeous new twine from Lawn Fawn. Love. It.

If by some chance you absolutely have to have one (and don't feel like making it yourself), I do have it up in my shop!

So, what are everyone's Easter plans? Please share!

Happy Crafting!

Thursday, March 8, 2012

Craft Show Season is Coming...

...and boy am I not quite ready! Yes, that's where I've been instead of blogging: locked in the craft room coming up with items to replace all of my holiday things. Somehow I don't think people want to buy Christmas ornaments in March...I could be wrong, but better to play it safe. I've been scouring the web for cute ideas and collecting them on my Pinterest board. Of course, the time has come to stop collecting and start making, especially since the first show of the year is this Saturday!  Eeep!

So while I'm about to head upstairs and start assembling magnetic grocery lists, here's a peek of what my dining room table looked like Tuesday:
Of course that's my coffee cup. Like I craft without it?!?


Yup, tile coasters! I made up an entire case of them (one case = 80 tiles). There they sit, drying, hoping that no kitty or toddler gets their grubby paws on them. (Thankfully they were safe, but it was a valid concern.)

Closer shots of the patterns (yeah, they're not great, but it was my camera phone into direct sunlight. Give me some credit!)
One half of the table...
...second half of the table
They came out really cute. Now hopefully they'll all get nice homes on Saturday! If you're in the area, stop by the Johnstown High School and adopt a few sets, hmm? :)

Ok, off to play with grocery lists and Modge Podge...erm, though not together.

Happy Crafting!

Tuesday, January 31, 2012

Take a Note!

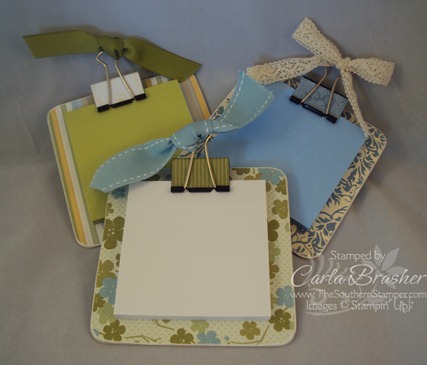
I've been hunting the web for new ideas for craft shows. Hopefully I'll be in two come March and was faced with the problem of what to fill the table with instead of, oh, Christmas ornaments...I know, what a thought. In my wanderings I came across these cute little Post-it note clipboards and had to try them myself.
Ridiculously cute, right?? Off to Staples I went to stock up on Post-it notes and binder clips (two of my favorite things). They're so, SO simple to make as well! Here's what you need:
  • chipboard or really stiff cereal box cardboard cut to 4"x4" for the base
  • pretty paper cut to 4"x4", two pieces for each clipboard
  • medium-sized binder clip
  • more pretty paper cut to 1.25"x2"
  • adhesive
  • sandpaper
  • ribbon
  • corner rounder or crop-a-dile
  • Post-its
From here, it's really simple. Take your chipboard and put a piece of the 4"x4" paper on each side, sticking it down with adhesive. While that dries/sits, cover your binder clip with the smaller paper strip tacking it down with adhesive on each side. Round the edges of your chipboard with your crop-a-dile, corner rounder, or scissors. Use the sandpaper to even out all the edges and give it a slightly rustic look. Clip the Post-its to the chipboard with your decorated binder clip, tie a ribbon on it, and you're done! Here's how mine came out:
I'd love to see how yours come out if you try the project! Happy crafting!


Here's where I'm linking up to this week:


Monday, January 23, 2012

Time to Get Organized!

So my craft room had sort of gotten to the point where it was, well, a semi-organized mess. I knew it wasn't great, but with craft shows and the holidays there simply wasn't time to clean up. I started thinking about organizing again while at Target...their dollar bins had letter trays and assorted organizers. Ok, time to clean!

I spent two hours the other night sorting, sifting, filing, organizing, and tossing. It was almost embarrassing how many canvas boxes I had still in their wrappers! Those I used for my Cricut cartridges, Sizzix supplies, and boxes of card blanks. Those along with my Cricut, Big Kick, and new Spellbinder machine fit nicely in the one corner.
The wood you see is my laundry rack. Great in the summer, too cold this time of year!
Moving all of those around freed up space on my side table. There my stamps were slightly reorganized (I moved Christmas/winter to their own bin), Sharpies neatened in their bin, stamp pads sorted, and my assorted 'other things' neatened. Now I had space to add a letter tray for finished projects, one for open online orders, and get my tin o' templates where I can actually find it!
Business cards & mailing inserts are right by outgoing orders...think of it!
Next up was my work space...ugh. Paper scraps were taking up the majority of it, followed by punches, partially completed projects, pieces leftover from projects that could still be used...yeah, it was a mess. I started by using my $2.50 Target find - an over-the-door shoe organizer! It fit nearly all of my punches, just the really big ones are left on the table.
Tiny ones bunched together nicely and seasonal is on the bottom
After another 30-40 minutes of figuring out what was left on my table, it cleaned up well. The large paper scraps I moved to an empty 12"x12" scrapbook paper container I had picked up exactly for that purpose. All of my card base paper I use all the time I tucked under the table (easy when my "table" is actually a huge piece of wood on top of a bunk bed!). Out of the way, nice and flat, and very close by when I'm making cards.
Chipboard, envelopes, kraft paper...and it must be Valentine time with all that pink & red!
That cleaned off a LOT of space up top! I put stamps back away, moved Christmas back to its storage bins, and threw out some scraps that were miniscule and I was silly to keep. Now I had room to put my standard tools where the punches had lived, get my cutter out of the way, and had a much more manageable stack of scraps. The last letter tray I used to corral all those bits 'n pieces I was keeping so they don't get lost or destroyed. I left out the season I was currently on (Valentines!) but hey, there was actually room to do so! Wow!
A much, MUCH more organized end of the table!
Now I actually have room to lay out my supplies for whatever I'm working on AND have a ton of space leftover to work. See, I was already painting puzzle pieces!
My new, clean workbench! Yes, that is a Care Bear in the corner...he keeps me company
It was so great being reorganized that I made four cards last night - woohoo! It's amazing what you can do when you can find your supplies. :)

If you're curious about what the puzzle pieces were for, take a look in the shop: You're the Perfect Match

How have you organized your crafting space? I'd love to hear from you!

Happy Crafting!

Sunday, January 22, 2012

Say it with Conversation Hearts!

I was inspired by the Crafty Steals blog to try to make a card from a sketch...I think it came out rather cute:
After all, who says that conversation hearts are only for kids? A little paper punching, some ribbon, add a smattering of embossing, ink everything...tada! I simply used my own handwriting for the sentiments, in classic conversation heart red. What do you think? If you really, really must have one of you own I've got it up in my Etsy shop.

Ok, now I'm off to play with all the fun 'toys' I bought today...yay! The one nice thing about having a husband glued to the PS3 is that I get plenty of craft room time...mwahahahaha...

Happy Crafting!